Getting Started
Before you Install
Before you start installing BackSlash Linux for your Enterprise solutions, you want to take care of a few things. These things are discussed in this section. You’ll first learn what exactly BackSlash Linux is. Then you’ll learn how you can get access to the software. We then discuss the BackSlash Linux add-ons, as well as the setup requirements. After you know all about these, you move on to the next section, where you learn how to install BackSlash Linux.
What is BackSlash Linux?
BackSlash Linux is a Linux distribution. As you probably know, Linux is a free operating system. That means that you get BackSlash Linux for free. However, you cannot use BackSlash Linux Sven for Free if you are using it for Enterprise/Corporate use.
To use BackSlash Linux Sven for Enterprise use, you need a subscription. This subscription entitles you to a few additional items, such as support and patches. When you pay for BackSlash Linux Enterprise Subscription, you get access to some extra features present in the Operating System. It is not that you get a separate download file, but there would be some extra benefits that are a normal requirement in corporate environments:
- Monitored updates and patches, which is not just updates and patches, but updates and patches that have gone through a thorough testing procedure
- Live Chat with an Advisor for help and support
- A certified operating system that is guaranteed to run and to be supported on maximum number hardware models
- A certified platform for running enterprise applications such as SAP, Oracle Database, and many more
Preparing to Install BackSlash Linux
Before you install BackSlash Linux to your computer, make sure your computer meets the minimum requirements for installation. Also note that every installation is done in GUI mode only.
System Requirements
- 2Ghz Dual Core 64-bit Processor
- 2 GB RAM
- 40 GB Hard disk
- USB Port/DVD Drive for Installation
- VGA capable of 1024x768 screen resolution
- Internet access is helpful
Migrating from a PC or Mac
Migration of Applications from a PC or a Mac is not possible in BackSlash Linux as all of them are different Operating Systems and support different application formats which are not interrelated. However you can backup your data on a separate partition to access that data later after the Installation of BackSlash Linux. Also there is some inter-compatibility between BackSlash Linux and Windows that allow Windows Applications to run on BackSlash Linux. You could also backup your Windows Executables/Installed Applications and see if they work on BackSlash Linux. A list of working application is present on https://appdb.winehq.org
Performing a clean installation
Even if BackSlash Linux can be installed from other media such as a DVD, the most common installation starts from the installation USB. Take your installation USB and boot the computer on which you want to install BackSlash Linux. The following steps describe how to proceed from the moment that you see the installation boot screen:
After booting from USB, you’ll see the BackSlash Linux boot menu. From this menu, you can choose from different options:
- Install BackSlash Linux: Choose this for a normal installation.
- Start BackSlash Linux Live: Select this if before installing you want to test the installation media. Notice that this will take a significant amount of time.
When the installation program starts, you can pass boot options to the kernel, so enable or disable specific features. To get access to the prompt where you can add these options, press Tab from the installation menu. This will show you the kernel boot line that will be used and offers an option to change boot parameters.
To start a normal installation, just select the Install BackSlash Linux option.
Once the base system from which you will perform the installation has loaded, you see the Welcome screen. From this screen, you can select the language and the keyboard setting. If you are working on a non-US keyboard, from this screen you can select the keyboard setting.
After selecting Keyboard and Language continue to select date & time zone, configure your partition settings and continue to create a user. The user you create will be administrator by default. You can continue to create more users after the system has been installed.
Manual Partitioning:
Incase you select manual partitoning for you BackSlash Linux installation, you will need to configure the partitions as follows:- An ext4 or XFS partition with minimum space of 40 GB and mount point as / (root)
- A swap partition is not required for BackSlash Linux as it will create a swapfile automatically, however you can also manually configure a swap partition (optional).
After the installation has completed, restart your system as prompted.
Dual booting your System
Dual boot with a Mac
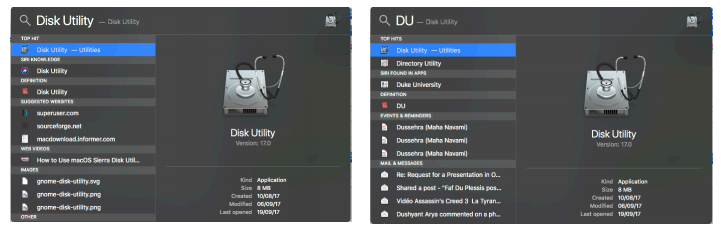
Start MacOS and press ⌘ + Space to bring up the spotlight and Type “Disk Utility” or “DU” to bring up the Disk Utility and press return (enter) key.
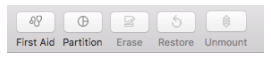
In the Disk Utility, Select your Hard Disk and Click “Partition” present on the top bar.
Next, you will be presented by the following screen:
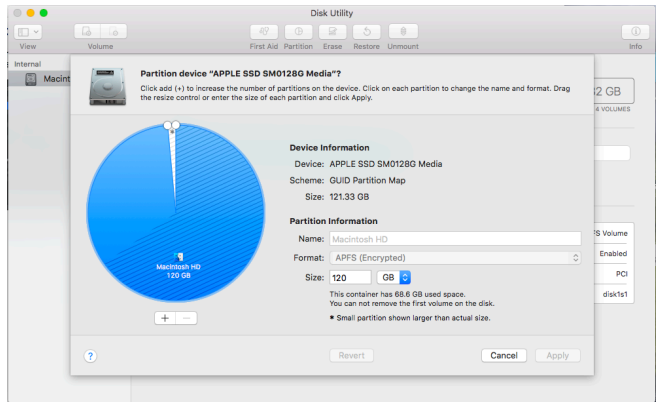
Click the “+” Icon and macOS will automatically partition the disk. Adjust the size if you need toand reboot your Mac and boot with the USB and start the Installer and at the Disk Setup Screen,Select “Manual” Instead of “Guided - use entire disk”. Now set up your partitions. You need the following partitions:
A Root Partition - Minimum 40 GB in Size. Set the File system to “ext4" and Mounting locationto root “/”.
An ESP Partition - 100 MB in size. Set the file system type to “ESP”.
Dual Boot with PC
Start Windows and Press Win + X to bring up the following menu and select “Disk Management” or press “k” to open it directly.
You will be presented by a similar screen. Here, setup your partitions and reboot your system.
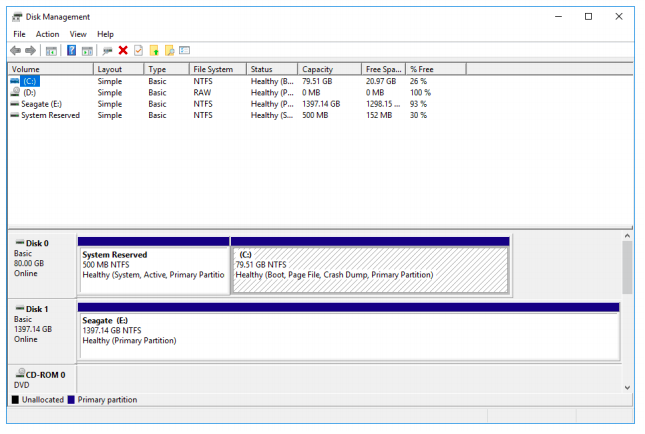
Required Partitions:
Root Partition : Minimum 40 GB in Size. Set the File system to “ext4" and Mounting location to root “/”.
ESP: 100 MB in size. Set the file system type to “ESP”.
Dual Boot with any other Linux
Start you current Linux installation and start respective program and setup your partitions.
Next, reboot your PC and boot with USB and start the Installer and at the Disk Setup Screen, Select “Manual” Instead of “Guided - use entire disk”. Now set up your partitions.
Required Partitions:
Root Partition : Minimum 40 GB in Size. Set the File system to “ext4" and Mounting location to root “/”.
ESP: 100 MB in size. Set the file system type to “ESP”.